When to Set Static IP Address on Android Smartphones?
To increase the security of the network, a lot of Wi-Fi devices are now configured with the DHCP disabled in them. To know how to set up your Wi-Fi router with this Setting, check my article on that topic. Once the DHCP is disabled in the Wireless router, no device can use internet through it, unless a manual IP Address is set in them. So, a mobile device connected to such a router needs static IP Address setting. This is required in addition to the Wi-Fi password that normally requires on DHCP enabled Wi-Fis also. This is an example of a situation where is it required to have manual IP Address on your smartphones. There are also a lot of other similar cases. To help you sustain in such situations, I am here explaining the step by step process on how to set IP Address on smartphones manually.
Before starting the process of changing the IP Address, I will first tell you how to check the current IP Address on your smartphones. For this, open the "Settings" option on your phone followed by the "WLAN" option. Then select the "More" option and then the "Advanced" menu. There you can find the IP Address of your smartphone mentioned as the "IPv4 Address". After changing the IP Address manually, you can check there again to make sure that it is changed as per your requirement.
How to Change IP Address on Android Smartphones/Tablets?
Now we will start the step by step process to change the IP Address of smartphones from DHCP to Static. I am explaining it with the help of a smartphone that runs on Marshmallow Operating System. The process may be a little bit different for another Android OS. However, if you go through the below process, you will be able to identify the options in the other OS also. The first step in this process is to open the "Settings" menu on your Android smartphones or tablets. There you can find the "WLAN" option. As I said earlier, the option may be a little bit different on your device. But you can easily find the Wi-Fi option on your smartphone.
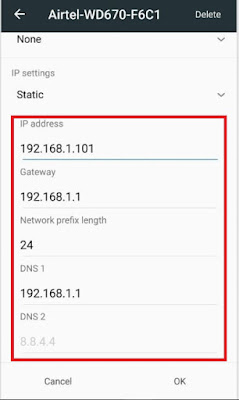
Now open the “WLAN” menu which will display all the available networks within that area. then select and open the Wi-Fi device that you want to connect. If it’s already not connected, it will ask you to enter the password. After entering the password, you will get connected to the Wi-Fi. Now open this connected Wi-Fi device’s option and you can see the “IP Settings”. It will be now displaying the “DHCP” as the selected mode. Change it to “Static”. As soon as you change this setting, you will get the option to manually enter the IP Address for your smartphone. Enter these details including the IP Address, Gateway, Network Prefix length, DNS1, DNS2 etc. and save the settings. All these details can be obtained from the administrator of the Wi-Fi router to which you are connected. This completes the process to set IP Address on smartphones in a static manner.


No comments:
Post a Comment