As discussed in one of my previous posts, the IP Addresses works as the backbones of the Internet System. Either it is your smartphone or the computers, IP Addresses are very much required to run internet on them. In the broadband routers that we use at our home, the IP Addresses are automatically provided by the ISPs. So, there is no need to setup manual IP for the internet connection. However, we can set up these broadband routers in such a way that all the connected devices should be given manual IP Address to get internet services. I recommend you enable this feature so that you can prevent unauthorized access to your network. To know how to enable it, visit my post on “How to Setup a Broadband Router/Modem?”. In this post, I will show you how to setup an IP Address on computer.
Set IP Address on Windows-Based Computers: -
Windows are the most commonly used Operating System available in the market right now. This Operating System developed by Microsoft is far ahead of the other OS in its usage. So, here we are also providing the step by step process to add IP Address on a Windows computer. The present versions of the Windows Operating Systems used by normal users are Windows XP, Windows 7, Windows 8 & 8.1 and Windows 10. There are also available versions of Windows servers that are normally used for official purposes. In all the above versions except Windows XP, the below method will work. As Microsoft already announced the End of Support for Windows XP, you should migrate to any other Windows versions.
How to Set Up Manual IP Address?
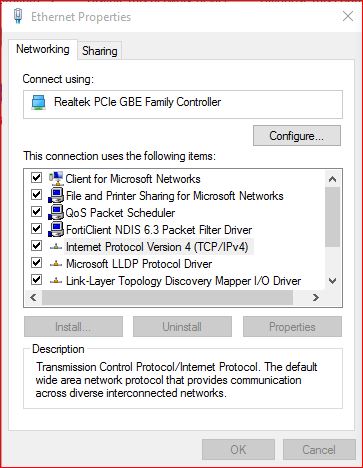
Click on the “Windows + R” button on your computer. This will open the “Run” menu. Type “ncpa.cpl” on the search bar and click “Enter”. This will open the “Network Connections” page on your screen. There you can find all the different available network connections on your device. The Wired LAN connections probably have the description of "Ethernet" and Wireless ones are mentioned as "Wi-Fi". Depending on your situation, you can right-click either one of these options and go to the "Properties" menu. There you can find the “Internet Protocol Version 4 (TCP/IPv4)” option. Double click on it and it will open the option to add IP Address on your computers.
Now select the “Use the Following IP Address” and it will provide you the option to add the IP Address, Subnet Mask & Default Gateway for your device. You must be available with these information if you want to proceed further. Enter each of these options one by one. Then select the “Use the Following DNS Server Addresses” option. Now you will be asked to enter the “Preferred DNS Server” and “Alternate DNS Server Address”. Enter these details and check again that you have input all the IP Address related information correctly. Then click on the “OK” button. If you find any notification to proceed further, click “OK” and move ahead. Now your computer will be able to work with the IP Address that we have manually setup.

To make sure that your computer has taken the IP Address open the “Run” menu again, type “CMD” and press Enter. In the newly opened window type “IPCONFIG” and click on the Enter button. In the result, check whether it displays all the information correctly as entered by us.
How to Setup Automatic IP Address?

There are situations when you are not required to enter IP Address on computer manually. It is when the DHCP (Dynamic Host Control Protocol) is enabled on your network. It means the main Internet device on your network automatically assigns IP Address to all the connected devices. In that case, there is no need to specify IP Address and other related information as mentioned in above process. Here also all the steps are same up to opening the window for entering the IP Address. But in this case, we will select the “Obtain an IP Address Automatically” option. We will also select the “Obtain DNS Server Address Automatically” option. After enabling these features, we won’t be able to add any IP Address related information manually. All the required details will be gained automatically.
No comments:
Post a Comment